Miscellaneous Operations Using sfftk
Viewing sfftk Version
To view the current version of sfftk run:
sff --V
sff --version
Viewing File Metadata
sff view <file>
The full list of options is:
sff view
usage: sff view [-h] [--sff-version] [-v] [-p CONFIG_PATH] [-b] [-C] [-X]
                [--print-array | --print-csv | --print-ssv]
                from_file

View a summary of an SFF file

positional arguments:
  from_file             any SFF file

optional arguments:
  -h, --help            show this help message and exit
  --sff-version         show SFF format version
  -v, --verbose         verbose output
  -p CONFIG_PATH, --config-path CONFIG_PATH
                        path to configs file
  -b, --shipped-configs
                        use shipped configs only if config path and user
                        configs fail [default: False]
  -C, --show-chunks     show sequence of chunks in IMOD file; only works with
                        IMOD model files (.mod) [default: False]
  -X, --transform       when specified, the file should be the segmented EMDB
                        MAP/MRC file from which to determine the correct
                        image-to-physical transform
  --print-array         display the implied image-to-physical transform as the
                        raw numpy array
  --print-csv           display the implied image-to-physical transform as a
                        comma-separated values form
  --print-ssv           display the implied image-to-physical transform as a
                        space-separated value form
Show MAP Header
For MRC-like files, sfftk will pretty-print the header by default.
sff view emd_5625.map
Mon Oct 17 09:44:16 2022        emd_5625.map: CCP4 mask of dimensions: cols=56, rows=56, sections=56
**************************************************
CCP4 Mask Segmentation
**************************************************
Cols, rows, sections:
    56, 56, 56
Mode: 2
Start col, row, sections:
    -28, -28, -28
X, Y, Z:
    56, 56, 56
Lengths X, Y, Z (ångström):
    236.8800048828125, 236.8800048828125, 236.8800048828125
α, β, γ:
    90.0, 90.0, 90.0
Map cols, rows, sections:
    1, 2, 3
Density min, max, mean:
    -1.4999780654907227, 7.940685272216797, 0.25216203927993774
Space group: 1
Bytes in symmetry table: 0
Skew matrix flag: 0
Skew matrix:
    0.0 0.0 0.0
    0.0 0.0 0.0
    0.0 0.0 0.0
Skew translation:
    0.0
    0.0
    0.0
Extra: (0, 0, 0, 0, 0, 0, 0, 0, 0, 0, 0, 0, 0, 0, 0)
Map: MAP
Mach-stamp: DA
RMS: 0.8693210482597351
Label count: 1
    ::::EMDATABANK.org::::EMD-5625::::

**************************************************
Show Image-to-Physical Transform
Passing the --transform argument to sff view for _MRC_-like files displays the implied image-to-physical transform.
sff view --transform emd_5625.map
Mon Oct 17 09:45:38 2022        Image space to physical space transform CCP4 MAP
Mon Oct 17 09:45:38 2022        Print type: numpy arrray (use -h/--help for other formats)
[[   4.23000009    0.            0.         -118.44000244]
 [   0.            4.23000009    0.         -118.44000244]
 [   0.            0.            4.23000009 -118.44000244]]
By default, a numpy.ndarray object is printed. You can control the presentation of the transform by specifying either
--print-csv to view the transform as a comma-separated sequence:
sff view --transform --print-csv emd_5625.map
Mon Oct 17 09:49:04 2022        Image space to physical space transform CCP4 MAP
Mon Oct 17 09:49:04 2022        Print type: CSV (use -h/--help for other formats)
4.230000087193081,0.0,0.0,-118.44000244140626,0.0,4.230000087193081,0.0,-118.44000244140626,0.0,0.0,4.230000087193081,-118.44000244140626
or --print-ssv to view the transform as a space separated sequence. This last option is helpful if the transform will be used as an input of another sfftk command.
sff view --transform --print-ssv emd_5625.map
Mon Oct 17 09:49:07 2022        Image space to physical space transform CCP4 MAP
Mon Oct 17 09:49:07 2022        Print type: SSV (use -h/--help for other formats)
4.230000087193081 0.0 0.0 -118.44000244140626 0.0 4.230000087193081 0.0 -118.44000244140626 0.0 0.0 4.230000087193081 -118.44000244140626
Show IMOD Chunks
The IMOD file format documentation describes that the files are partitioned into chunks, each commencing with four byte identifier. To view the chunks in an IMOD file run:
sff view -C file.mod
sff view --show-chunks file.mod
This can be helpful in checking an IMOD file for meshes (MESH chunks). For example, the file below
has a single mesh.
sff view --show-chunks sfftk/test_data/segmentations/test_data.mod
**************************************************
IMOD Segmentation version V1.2
Segmentation name: IMOD-NewModel
Format: IMOD
Primary descriptor: contours
Auxiliary descriptors: meshes
Pixel size: 1.90680003166
Pixel units: nm
xmax, ymax, zmax: (512, 512, 150)
No. of segments: 1
**************************************************
IMOD 2
OBJT 1
MESH 1
IMAT 1
VIEW 2
MINX 1
IEOF
Prepping Segmentation Files
Some files require preparatory steps in order to efficiently convert them into EMDB-SFF.
At present, preparatory steps are required for CCP4 maps. These filetypes typically store
segmentations as masks whereby the value of the voxels determine whether or not they are
part of or outside the segment. For example, if voxels are stored as floats, all non-zero
voxels are in the segment. Alternatively, a set of integer values may denoted various
segments. By default, these schemes use four bytes per voxel meaning that they files tend
to be at least four times as large as they ought to be. The sff prep binmap utility
converts the standard CCP4 files according to a set of available options into a more
compact file, whose data will then be efficiently embedded into the EMDB-SFF file.
sff prep
usage: sff prep [-h] Preparation steps: ...

Prepare a segmentation for conversion to EMDB-SFF

optional arguments:
  -h, --help          show this help message and exit

Segmentation preparation utility:
  The following commands provide a number of pre-processing steps
  for various segmentation file formats. Most only apply to one
  file type. See the help for each command by typing 'sff prep
  <command>'

  Preparation steps:
    binmap            bin a CCP4 map
    transform         transform an STL mesh
Binning Map Files
The binmap utility has the following options:
sff prep binmap
usage: sff prep binmap [-h] [-p CONFIG_PATH] [-b] [-m MASK_VALUE]
                       [-o OUTPUT] [--overwrite] [-c CONTOUR_LEVEL]
                       [--negate] [-B {1,2,4,8,16}] [--infix INFIX]
                       [-v]
                       from_file

Bin the CCP4 file to reduce file size

positional arguments:
  from_file             the name of the segmentation file

optional arguments:
  -h, --help            show this help message and exit
  -p CONFIG_PATH, --config-path CONFIG_PATH
                        path to configs file
  -b, --shipped-configs
                        use shipped configs only if config path and
                        user configs fail [default: False]
  -m MASK_VALUE, --mask-value MASK_VALUE
                        value to set to; all other voxels set to
                        zero [default: 1]
  -o OUTPUT, --output OUTPUT
                        output file name [default:
                        <infile>_binned.<ext>]
  --overwrite           overwrite output file [default: False]
  -c CONTOUR_LEVEL, --contour-level CONTOUR_LEVEL
                        value (exclusive) about which to threshold
                        [default: 0.0]
  --negate              use values below the contour level
                        [default: False]
  -B {1,2,4,8,16}, --bytes-per-voxel {1,2,4,8,16}
                        number of bytes per voxel [default: 1]
  --infix INFIX         infix to be added to filenames e.g.
                        file.map -> file_<infix>.map [default:
                        'prep']
  -v, --verbose         verbose output
Default Options
The binmap utility can be used with default values:
sff prep binmap --verbose file.mrc
By default, the binmap utility works with files with a .mrc, .map or .rec extension.
With verbose output this produces the following:
Fri Oct 12 11:27:38 2018    Reading configs from /Users/pkorir/.sfftk/sff.conf
Fri Oct 12 11:27:38 2018    Output will be written to file_prep.mrc
Fri Oct 12 11:27:38 2018    Reading in data from file.mrc...
Fri Oct 12 11:27:38 2018    Voxels will be of type <type 'numpy.int8'>
Fri Oct 12 11:27:38 2018    Binarising to 1 about contour-level of 0
Fri Oct 12 11:27:38 2018    Creating output file...
Fri Oct 12 11:27:38 2018    Writing header data...
Fri Oct 12 11:27:38 2018    Binarising complete!
which is a fraction of the original file:
-rw-------@ 1 pkorir  staff   381K 12 Oct 11:27 file.mrc
-rw-r--r--  1 pkorir  staff    96K 12 Oct 11:27 file_prep.mrc
Specify The Number Of Bytes Per Voxel
The most important argument is the number of bytes per voxel to be used in the output file specified using
-B/--bytes-per-voxel followed by an integer. By default, this is set to 1 (one) but can be
anything from the set 1, 2, 4, 8 or 16.
sff prep binmap file.mrc -B 2 -v --infix double
Fri Oct 12 11:49:55 2018    Reading configs from /Users/pkorir/.sfftk/sff.conf
Fri Oct 12 11:49:55 2018    Output will be written to file_double.mrc
Fri Oct 12 11:49:55 2018    Reading in data from file.mrc...
Fri Oct 12 11:49:55 2018    Voxels will be of type <type 'numpy.int16'>
Fri Oct 12 11:49:55 2018    Binarising to 1 about contour-level of 0
Fri Oct 12 11:49:55 2018    Creating output file...
Fri Oct 12 11:49:55 2018    Writing header data...
Fri Oct 12 11:49:55 2018    Binarising complete!
which will result in file that is roughly twice as big as would be produced by default:
-rw-------@ 1 pkorir  staff   381K 12 Oct 11:27 file.mrc
-rw-r--r--  1 pkorir  staff   191K 12 Oct 11:49 file_double.mrc
-rw-r--r--  1 pkorir  staff    96K 12 Oct 11:27 file_prep.m
Specify The Contour Level
The contour level about which binarising should be carried is specified using the -c/--contour-level
argument. The default contour level is 0.0 (zero). Note that this is an exlusive value i.e. all voxels
with values equal to the contour level will be excluded.
sff prep binmap -c 0.5 -v file.mrc
sff prep binmap --contour-level 0.5 -v file.mrc
Specifying A Mask Value
The voxel value that designates the segment may be set by setting the -m/--mask-value argument.
The default value is 1 (one).
sff prep binmap -m 2 -v file.mrc
sff prep binmap --mask-value -v file.mrc
Negate The Mask File
By default, all values greater than (not greater than or equal to) the contour level will be treated
as being in the segment. All other voxels will be outside the segment. This can be reversed using
the --negate argument.
sff prep binmap --negate -c 0.5 -v file.mrc
Specify The Output File Infix
To prevent accidentally overwriting the original file, the default output file has a _prep infix i.e.
the file file.mrc is converted to file_prep.mrc. This infix can be changed using the --infix
argument.
sff prep binmap file.mrc --infix binned
Fri Oct 12 11:47:29 2018    Reading configs from /Users/pkorir/.sfftk/sff.conf
Fri Oct 12 11:47:29 2018    Output will be written to file_binned.mrc
Fri Oct 12 11:47:29 2018    Reading in data from file.mrc...
Fri Oct 12 11:47:29 2018    Voxels will be of type <type 'numpy.int8'>
Fri Oct 12 11:47:29 2018    Binarising to 1 about contour-level of 0
Fri Oct 12 11:47:29 2018    Creating output file...
Fri Oct 12 11:47:29 2018    Writing header data...
Fri Oct 12 11:47:29 2018    Binarising complete!
Specifying The Output File
The output file can be specified using the -o/--output argument. Be default, the name of the output
file is determined from the name of the source file plus the infix (“prep”). Note that the infix will
not be used when an output file is specified.
sff prep binmap file.mrc -o my_output.mrc
Fri Oct 12 12:06:41 2018    Reading configs from /Users/pkorir/.sfftk/sff.conf
Fri Oct 12 12:06:41 2018    Output will be written to my_output.mrc
Fri Oct 12 12:06:41 2018    Reading in data from file.mrc...
Fri Oct 12 12:06:41 2018    Voxels will be of type <type 'numpy.int8'>
Fri Oct 12 12:06:41 2018    Binarising to 1 about contour-level of 0
Fri Oct 12 12:06:41 2018    Creating output file...
Fri Oct 12 12:06:41 2018    Writing header data...
Fri Oct 12 12:06:41 2018    Binarising complete!
Overwrite The Original File
If you want to replace the original file (not recommended) you may do so using the --overwrite argument.
Be default, trying to overwrite the original file will fail.
sff prep binmap file.mrc -o file.mrc
Fri Oct 12 11:43:16 2018    Binarising preparation failed
Fri Oct 12 11:43:16 2018    Attempting to overwrite without explicit --overwrite argument
Transforming STL Meshes
It is often necessary to transform meshes contained in STL files so as to get better alignment with images. To do this we need a 4X4 matrix with the parameters.
sfftk uses two kinds of parameters for this:
rotation parameters, which are the top-left 3X3 sub-matrix;
translation parameters, which are the top-right 3X1 sub-matrix;
Rotation parameters are specified by providing both the physical and
image dimensions of the segmented volume’s bounding box (not the bounding box containing the particular segment, which will vary between segments). This is then used to determine
the voxel dimensions. The physical dimensions of the bounding box are
specified using the -L/--lengths argument while the image
dimensions of the bounding box are specified using the -I/--indices.
Each of these arguments take three values - one for each of x, y and
z.
Optionally, the -O/--origin argument specifies the location of volume’s origin
and similarly take three values for each of x, y and z. The default
is located at (0.0, 0.0, 0.0) i.e. it is assumed that the segmented volume has one vertex closest to the origin coincident with the origin.
sff prep transform --lengths <x-length> <y-length> <z-length> --indices <x-size> <y-size> <z-size> file.stl
or with a translation
sff prep transform --lengths <x-length> <y-length> <z-length> --indices <x-size> <y-size> <z-size> --origin <x> <y> <z> file.stl
Specifying The Infix
By default the output is written to a file with a name composed of the original
file name with an infix. For example, if the input file name is file.stl,
then the output filename will be file_transformed.stl. We can change the
infix with the --infix argument.
sff prep transform [params] --infix tx file.stl
# will write to file_tx.stl
Specifying The Output File
Alternatively, the name of the output file may be specified using the
-o/--output argument.
sff prep transform [params] --output tx_file.stl file.stl
# will write to tx_file.stl
Merging Masks
Masks are a popular way to represent segmentations but they tend to be redundant. Typically, each mask is a binary mask with all image elements representing the object of interest set to 1 and all other image elements set to 0. When multiple such masks are used to represent multiple segments, the volume of data is unnecessarily large leading to the need to merge the masks into a single multi-labelled mask.
Merging masks needs to take into account various topologies of masks. Multiple masks introduces the possibility that objects may be of one of the following forms:
non-overlapping segments, is the trivial case where the number of labels is equal to the number of objects;
partial overlapping segments, in which image elements are shared between objects;
completely overlapping segments, whereby one or more objects are completely contained within one or more objects.
Any mask merging solution must account for these reversibly i.e. given a one or more binary masks, it should be possible to create
a single merged mask with multiple labels from which the original individual binary masks may be derived. This is what
the sff prep mergemask utility aims to accomplish (though we have not implemented the unmerge functionality).
Some tips when merging masks
Try to avoid merging overlapping masks—the resulting merged mask can be less straightfoward to understand. By default,
mergemaskwill NOT allow merging overlapping masks; you will need to enable this using the--allow-overlapflag.Before carrying out the merge,
mergemaskwill assess the files to make sure they are binary masks. Again, this can take forever for large and/or many masks. If you are sure that your masks are binary with voxels of values0and1only, then you can skip assessment using the--skip-assessmentflag. If you prepped your masks usingsff prep binmap(e.g. from soft masks or binary masks with other voxel values) then it should be OK to use--skip-assessment.The current implementation of
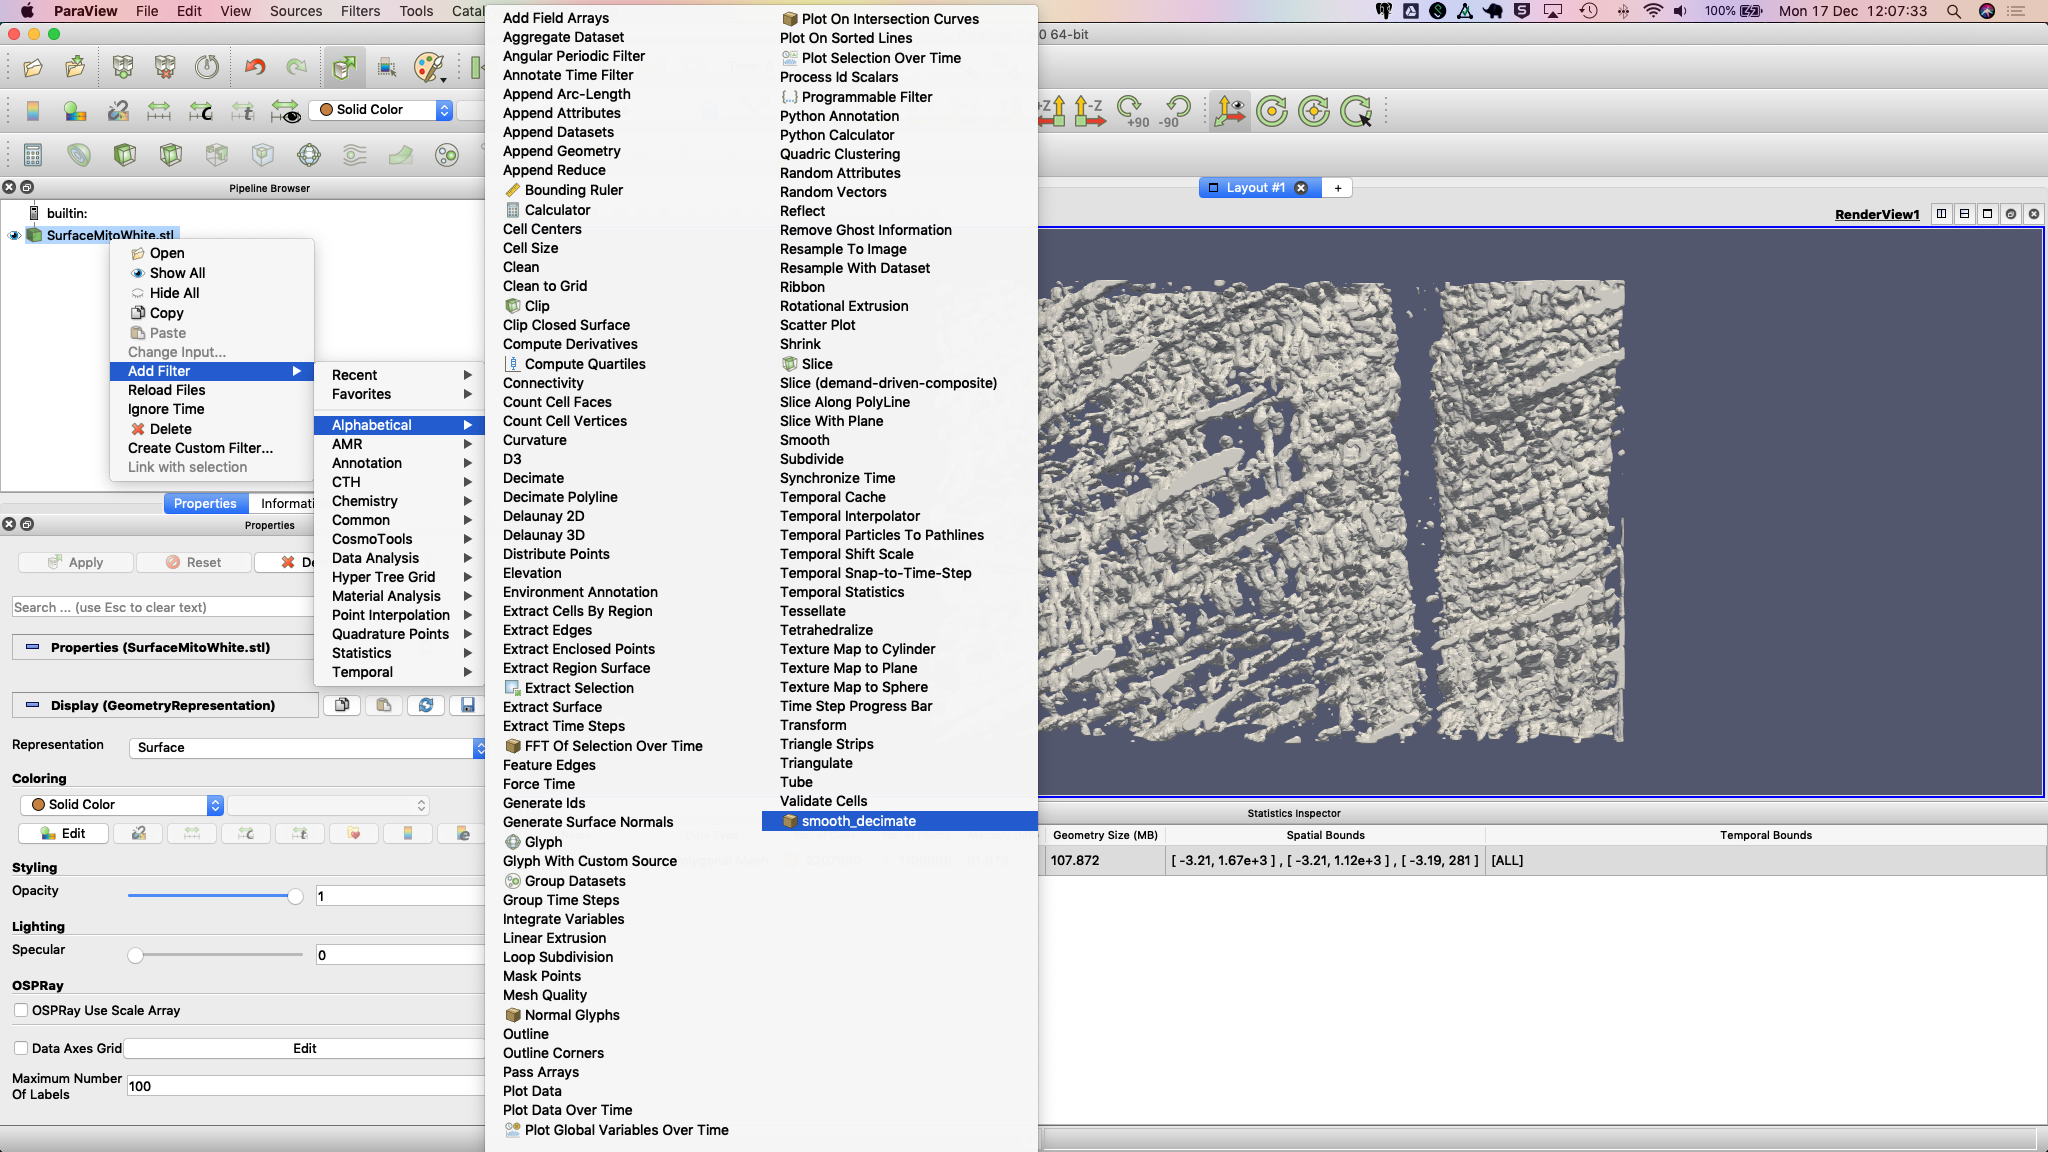
mergemaskis memory hungry so it is only recommended for small and/or few masks. Roughly, up to 100 masks under100^3should be OK.If you have large masks consider meshing them into STL. You can use a free tool like Paraview, which can read MRC-like files.
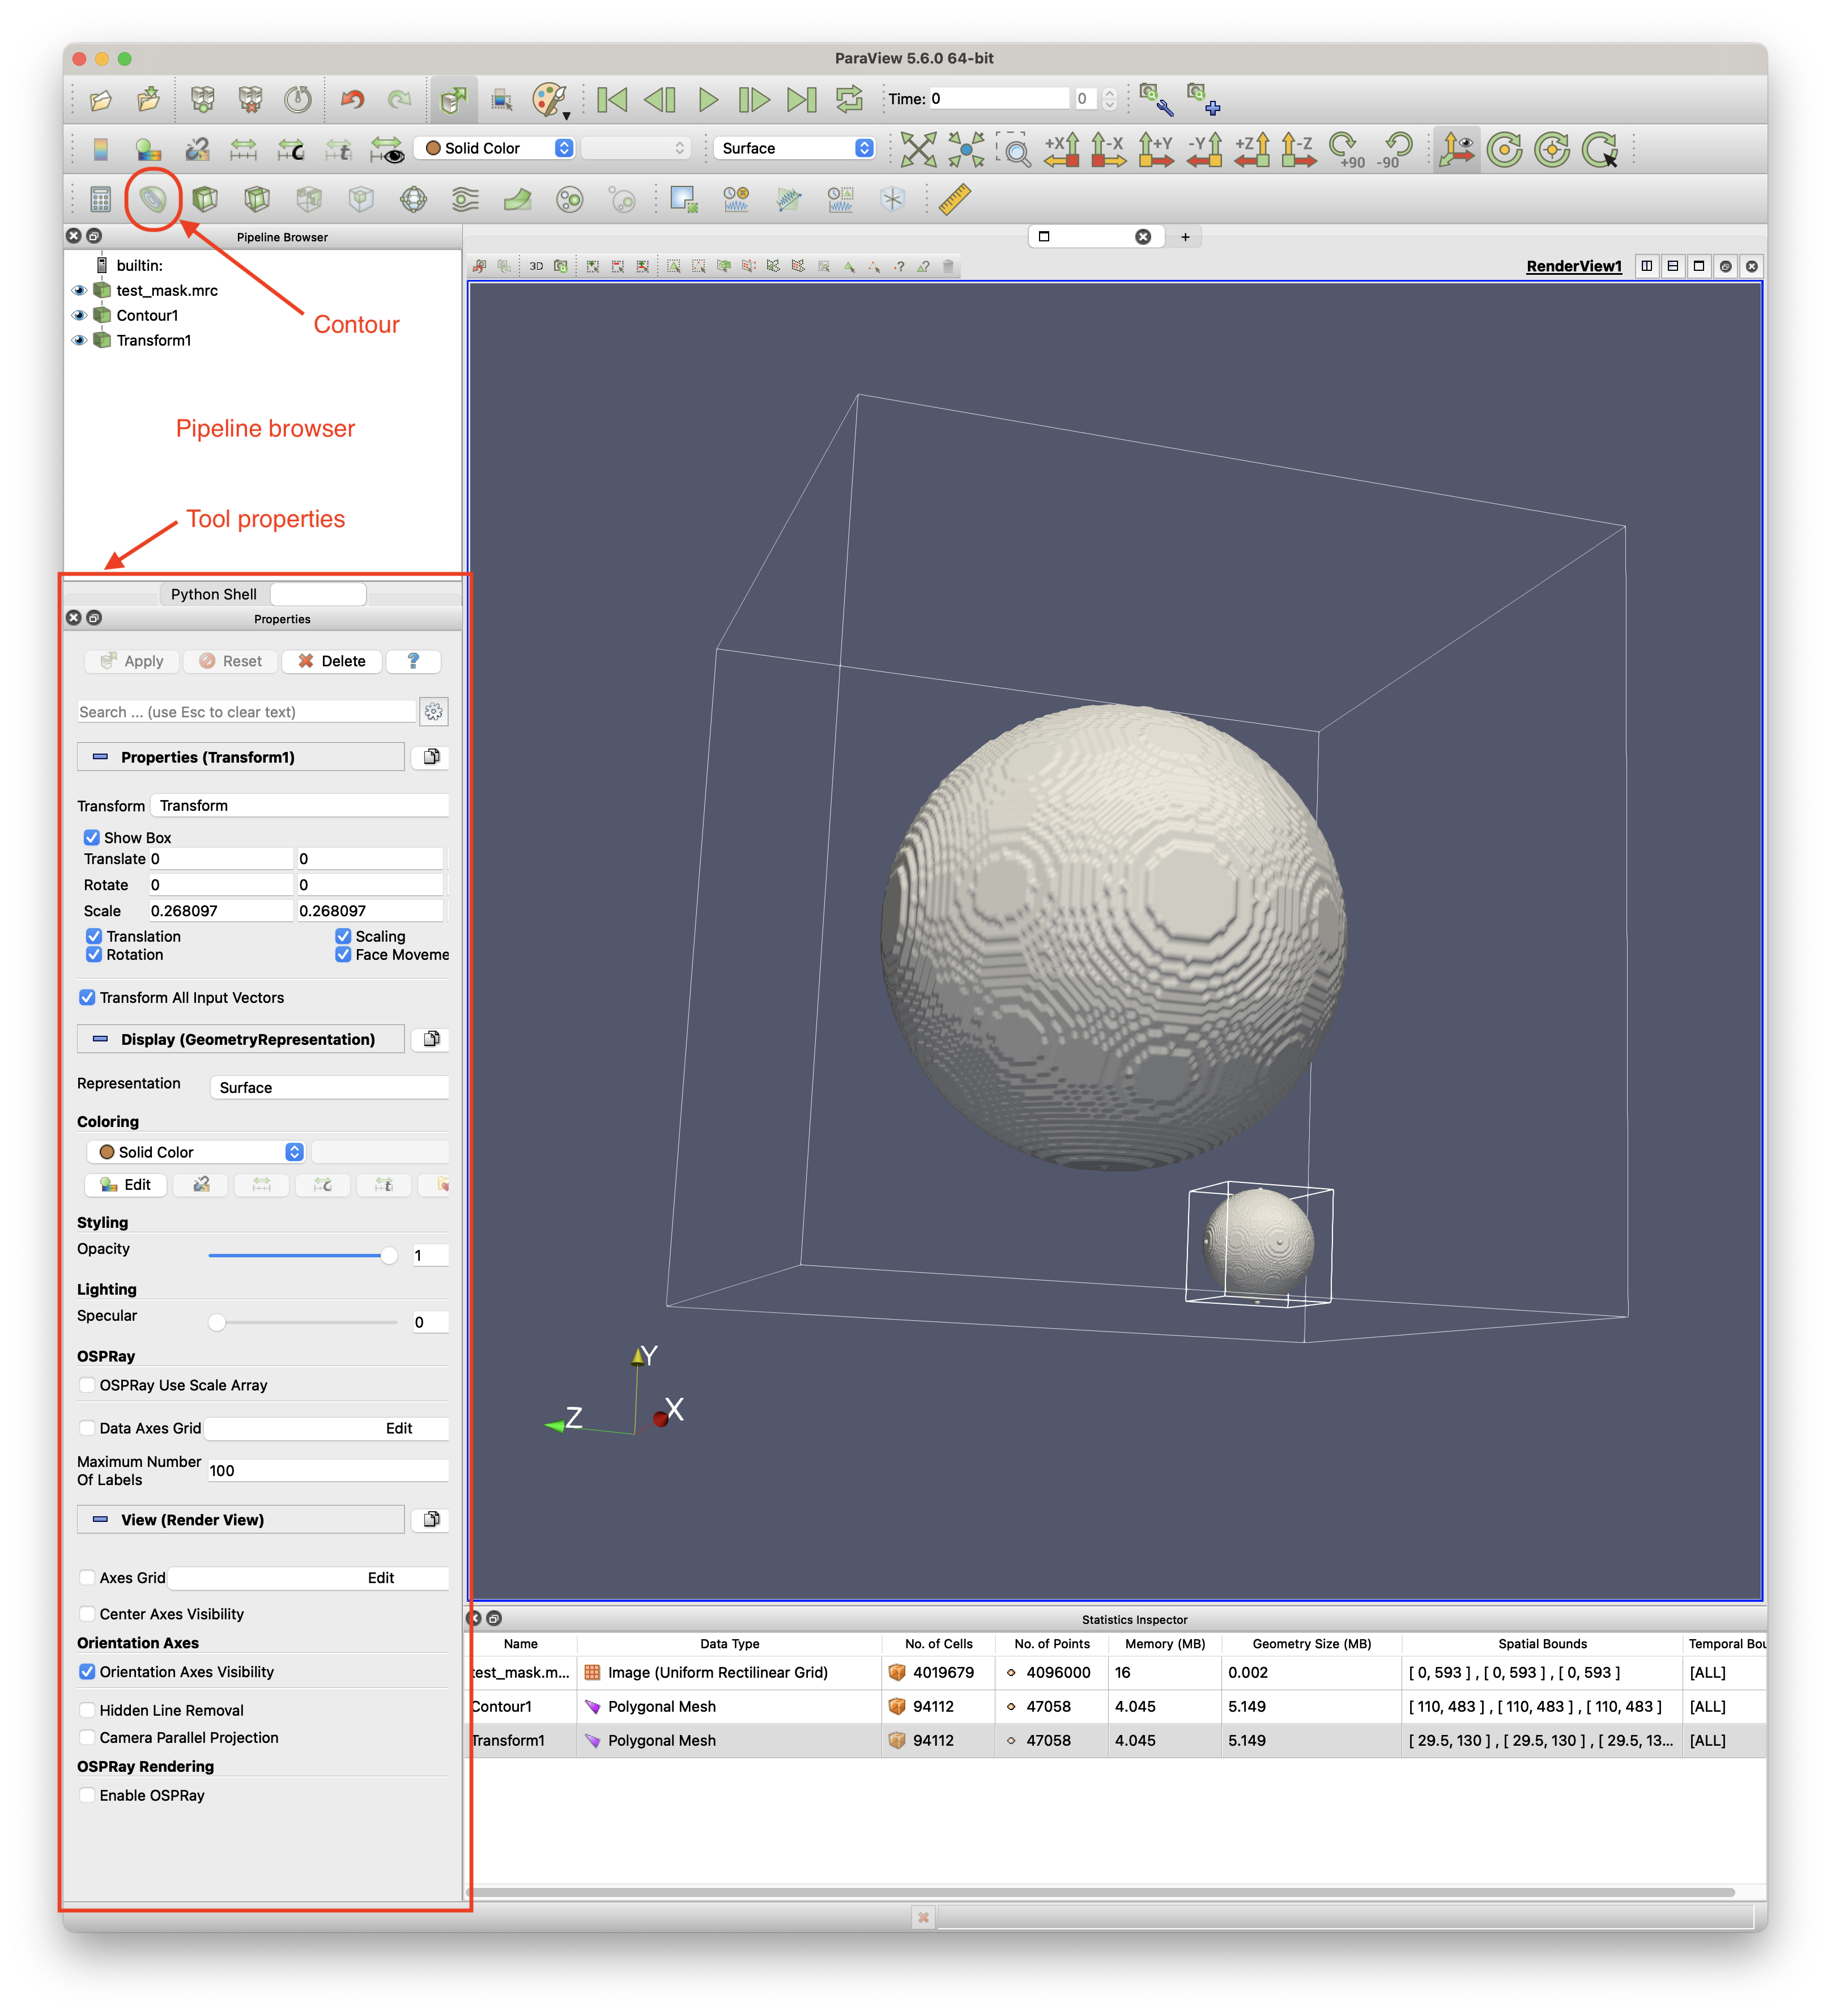
In Paraview, right-click inside the Pipeline Browser and choose Open… to open the MRC file. See the image above for the Paraview interface sections.
Click the file object in the Pipeline Browser then click the Contour tool to generate an isosurface (for a binary mask, it will automatically pick the right contour level). Modify the value of the contour level in Tool properties in the Isosurfaces field.
Apply a Transform to the generated contour to ensure the mask mesh is in image space. Do this by right-clicking the contour in the Pipeline Browser, select Add Filter / Alphabetical / Transform. In the Tool properties, adjust the scale parameters (for X, Y and Z) to be the reciprocal of the corresponding sizes of the unit cell i.e. if a unit cell has X or 10 then set the scale to 0.1. The units do not matter. You can open the Statistics Inspector (View / Statistics Inspector) to verify that the mesh’s bounds are within the image’s size bounds.
Save the mesh by first selecting Transform1 in the Pipeline Browser then clicking File / Save Data… then choose STL from the file type dropdown. You can also save considerable space by first carrying out Mesh Reduction before saving.
Bear in mind that due to the nature of masks and STL files to store one segment per file, conversion will require the
--multi-fileflag. This only applies for non-merged masks, though.# for multiple masks (i.e. not merged) sff convert --verbose --multi-file mask1.mrc mask2.mrc mask3.mrc --format hff # for STL files sff convert --verbose --multi-file mesh1.stl mesh2.stl mesh3.stl --format hff
For large masks/segmentations prefer conversion to HDF5 (
file.hff):# merged mask (see notes below on the output of merging) sff convert --verbose merged_mask.mrc --label-tree merged_mask.json --format hff # multiple masks sff convert --verbose --multi-file mask1.mrc mask2.mrc mask3.mrc --format hff # STL meshes sff convert --verbose --multi-file mesh1.stl mesh2.stl mesh3.stl --format hff
The result of running sff prep mergemask is two artefacts:
merged_mask.mrc is the single, multi-label volume of the same dimensions as each binary mask.
- merged_mask.json is the label tree indicating two attributes:
mask_to_label object relates the labels assigned to the original binary masks, and
label_tree object shows the hierarchy of labels used to capture complex topologies.
sff prep mergemask unmergeable_[1-3].map -v --overwrite
Mon Nov 28 12:28:58 2022        info: mask unmergeable_1.map has dimension (10, 10, 10)
Mon Nov 28 12:28:58 2022        info: mask unmergeable_2.map has dimension (10, 10, 10)
Mon Nov 28 12:28:58 2022        info: mask unmergeable_3.map has dimension (10, 10, 10)
Mon Nov 28 12:28:58 2022        info: assessing unmergeable_1.map...
Mon Nov 28 12:28:58 2022        info: assessing unmergeable_3.map...
Mon Nov 28 12:28:58 2022        info: assessing unmergeable_2.map...
Mon Nov 28 12:28:58 2022        info: proceeding to merge masks...
Mon Nov 28 12:28:58 2022        info: merge complete...
Mon Nov 28 12:28:58 2022        info: attempting to write output to 'merged_mask.mrc'...
Mon Nov 28 12:28:58 2022        info: attempting to write mask metadata below to 'merged_mask.json'...
Mon Nov 28 12:28:58 2022        info: mask metadata:
{
    "mask_to_label": {
        "unmergeable_1.map": 1,
        "unmergeable_2.map": 2,
        "unmergeable_3.map": 4
    },
    "label_tree": {
        "1": 0,
        "2": 0,
        "3": [
            1,
            2
        ],
        "4": 0,
        "5": [
            1,
            4
        ],
        "6": [
            2,
            4
        ],
        "7": [
            3,
            4
        ]
    }
}
Mon Nov 28 12:28:58 2022        info: merge complete!
Outputs (1) and (2) may then be passed to sff convert to create an EMDB-SFF file, which is much smaller than the
respective files generated using multiple masks simultaneously.
Warning
Mode of merged_mask.mrc
The computation of labels quickly exhausts the non-negative range of mode 0 (signed int8) masks therefore
mode 1 (signed int16) masks are used.
Don’t forget to supply the original image (using the --image flag) to correctly compute the image-to-physical transform otherwise you will get a warning as shown below.2
sff convert merged_mask.mrc --label-tree merged_mask.json -v --format hff
Mon Nov 28 12:28:03 2022        Warning: missing --image <file.map> option to accurately determine image-to-physical transform
Mon Nov 28 12:28:03 2022        info: assessing merged_mask.mrc...
Mon Nov 28 12:28:03 2022        Setting output file to merged_mask.hff
Mon Nov 28 12:28:03 2022        Exporting to merged_mask.hff
Mon Nov 28 12:28:03 2022        Done
Mesh Reduction
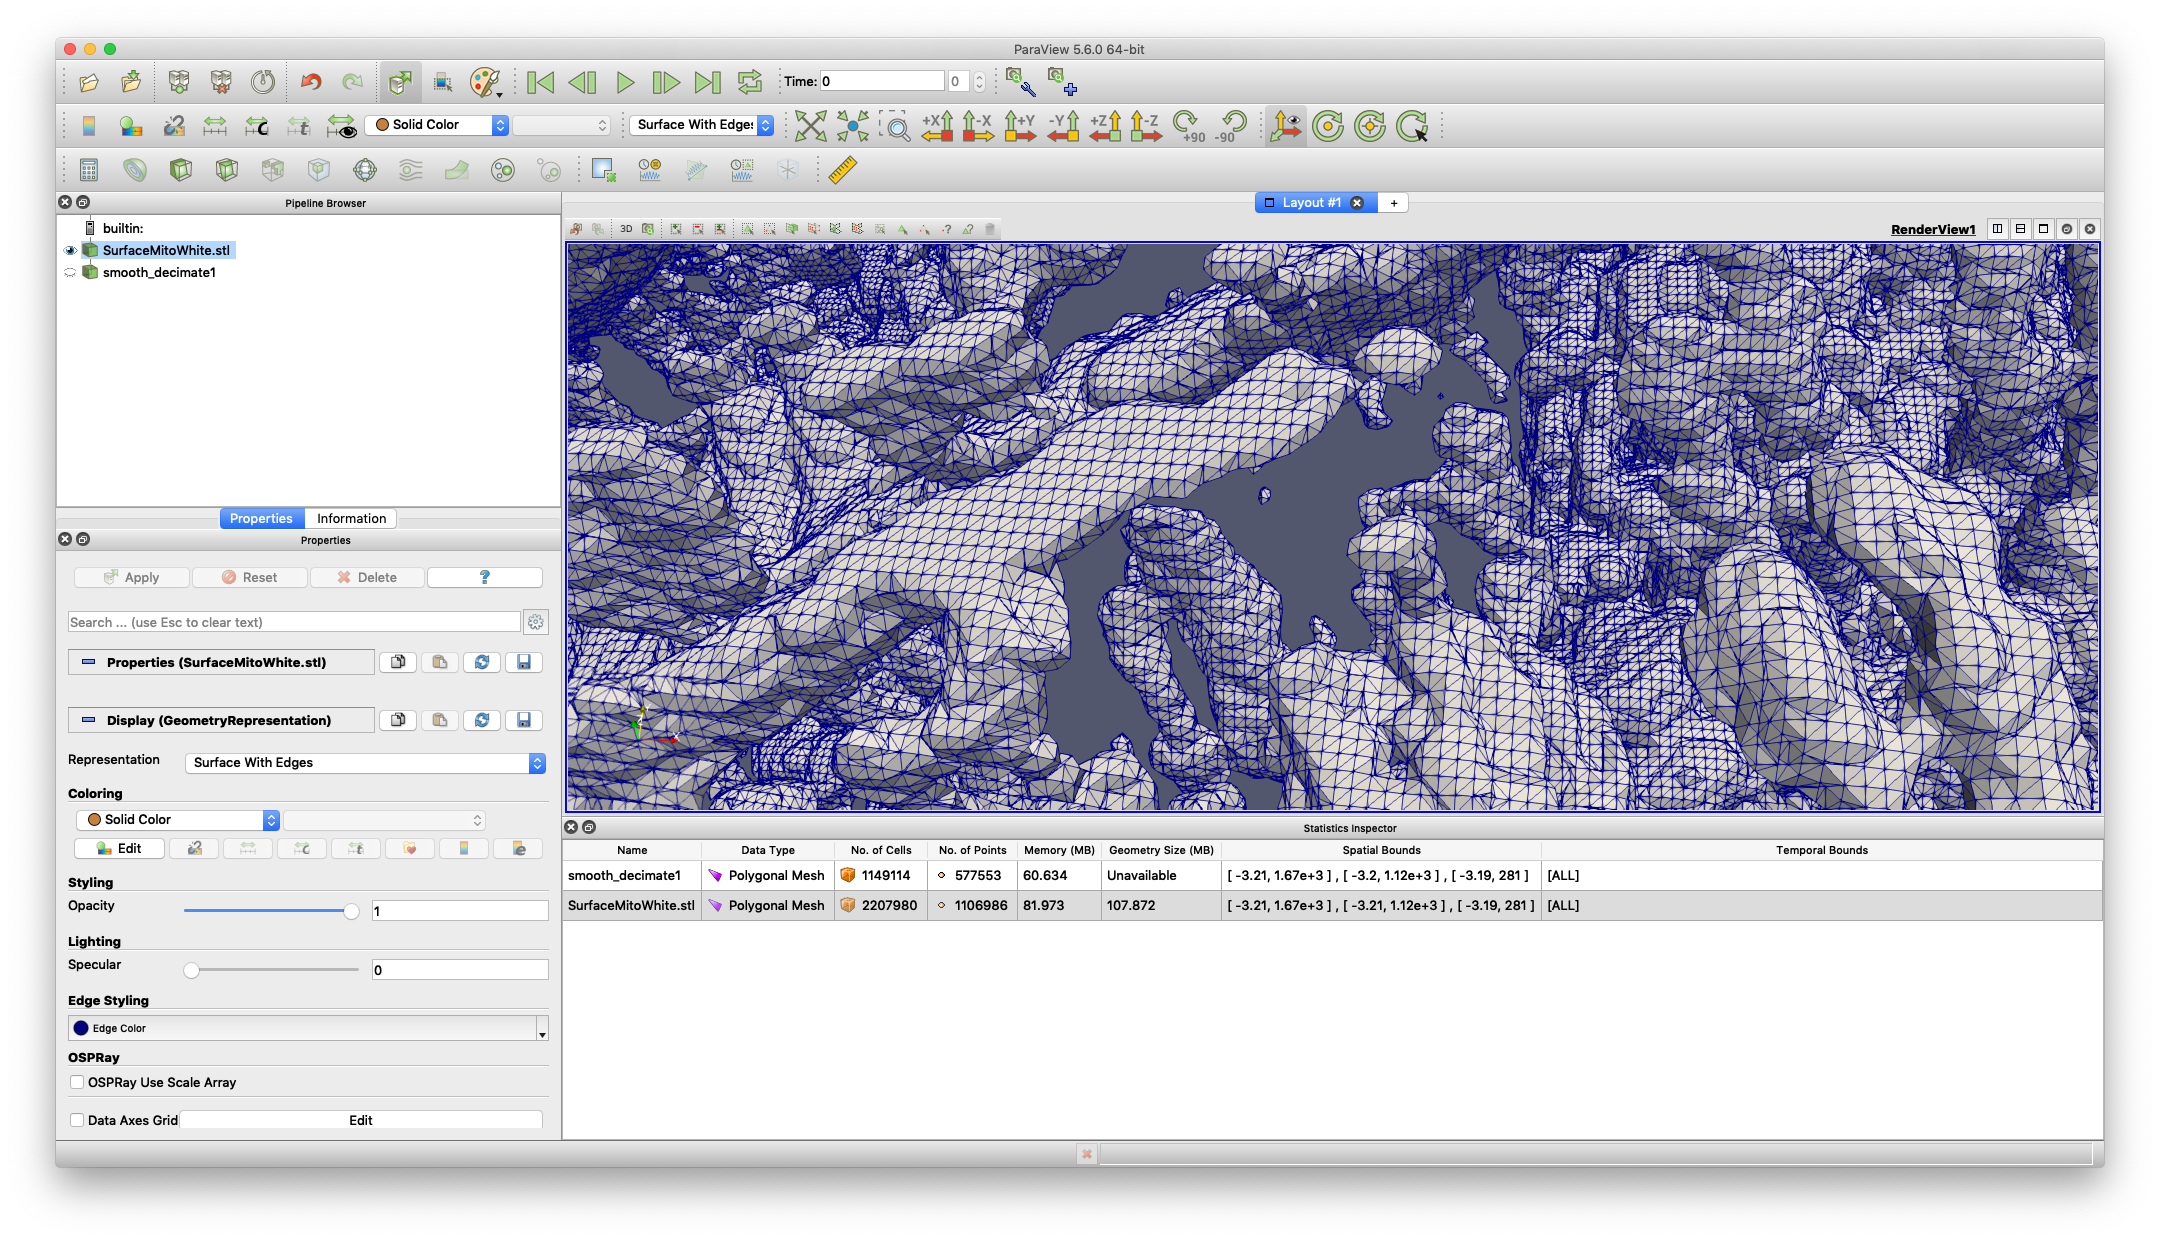
Naive marching cubes typically creates far more surface polygons than required leading to much larger files than necessary. Mesh reduction helps to eliminate reduntant polygons and thereby save disk space.
The simplest way to do this on an STL file is to use Paraview, which is a powerful freely-available 3D graphics
application developed by Kitware Inc.. We have created a custom filter that you can incorporate into your paraview installation to do this using
the following steps.
Launch Paraview.
2. In the Pipeline Browser, right-click and select Open from the context menu. This will open the file but depending on your settings may not seem to do anything. You might need to hit the Apply button in the Properties dialogue.

The Statistics Inspector (available under the View menu) shows how much memory the surface occupies.

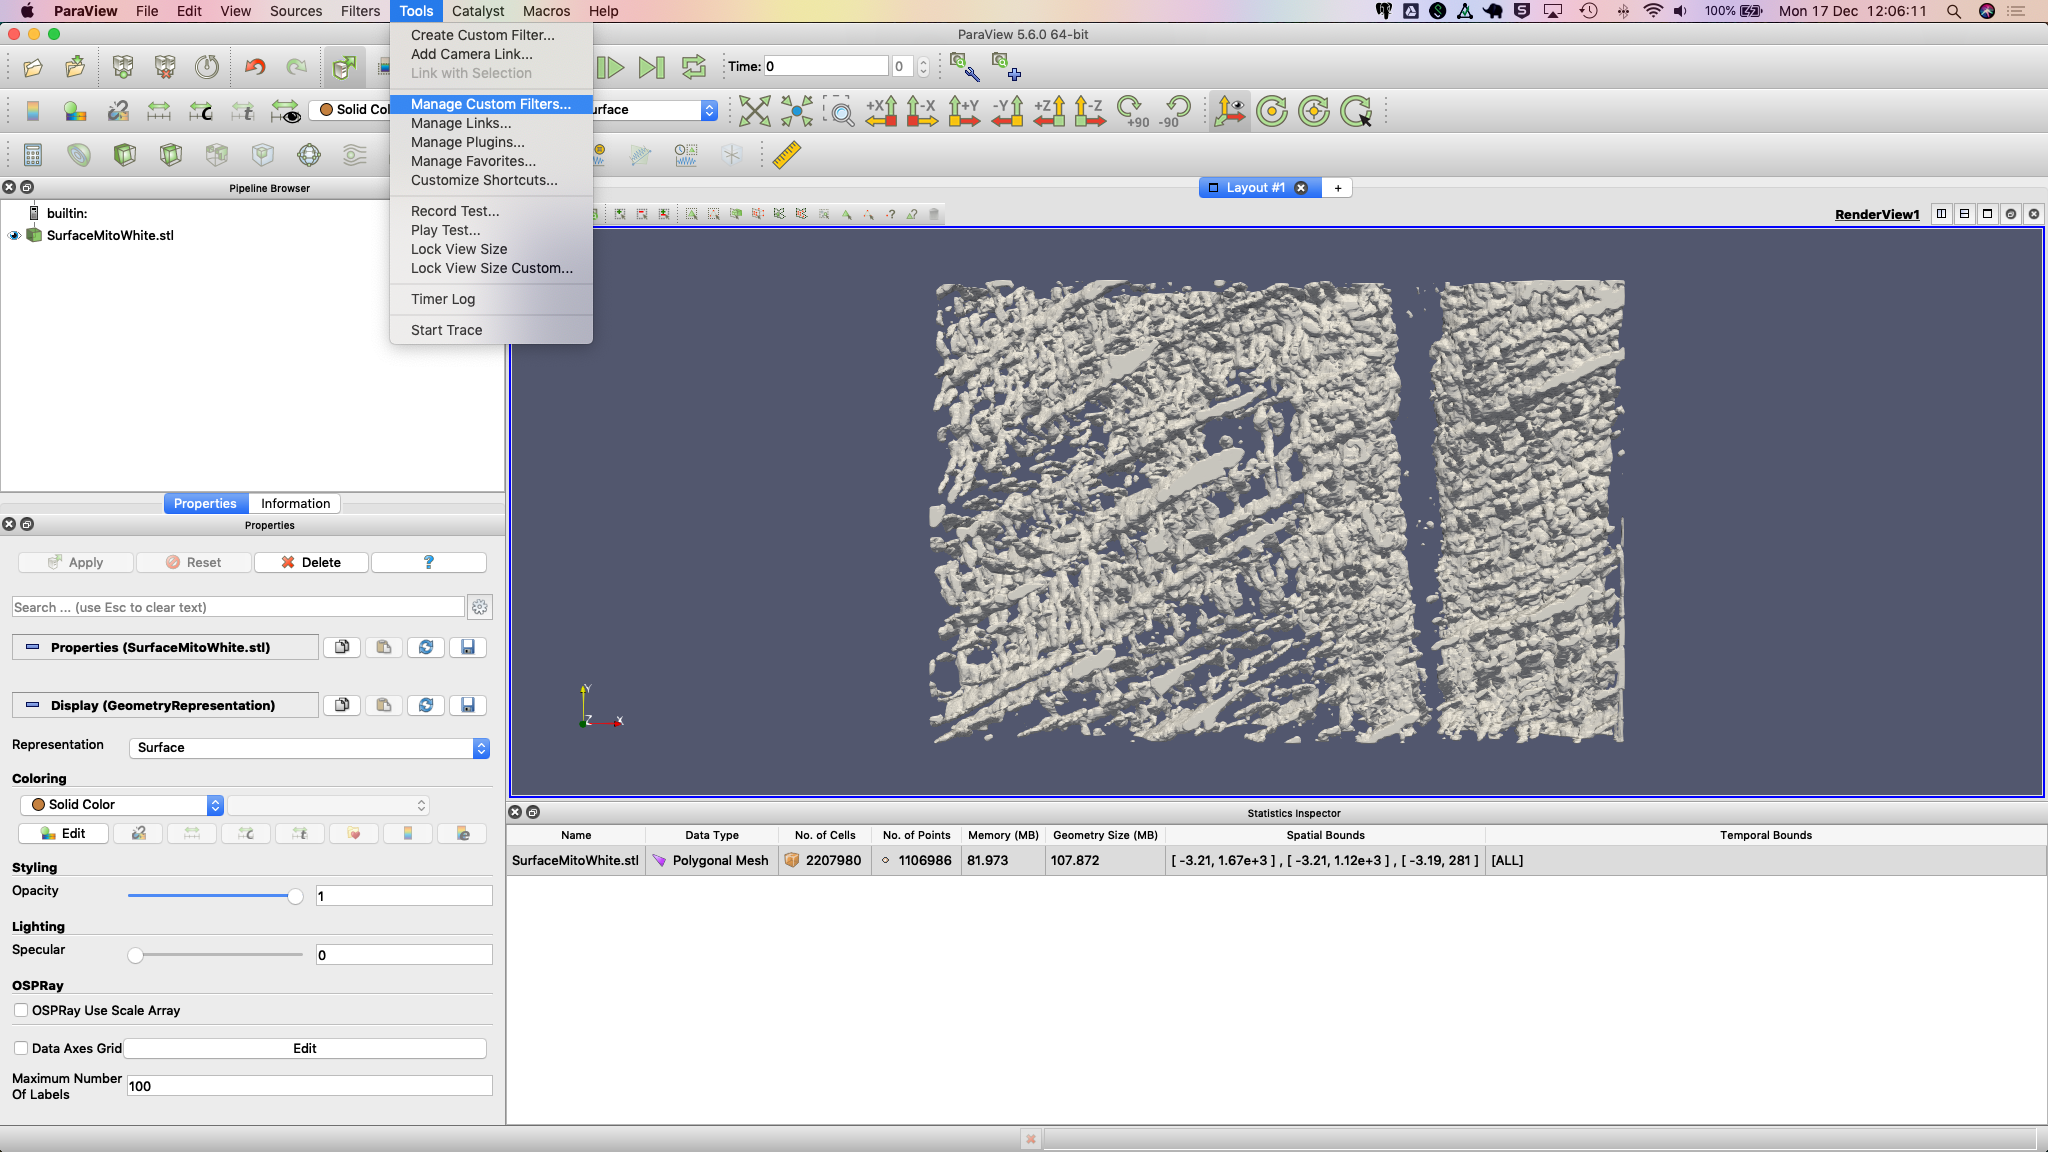
3. Make sure you have downloaded the custom filter then select Tools > Manage Custom Filters…. A new dialogue box
opens for importing custom filters.
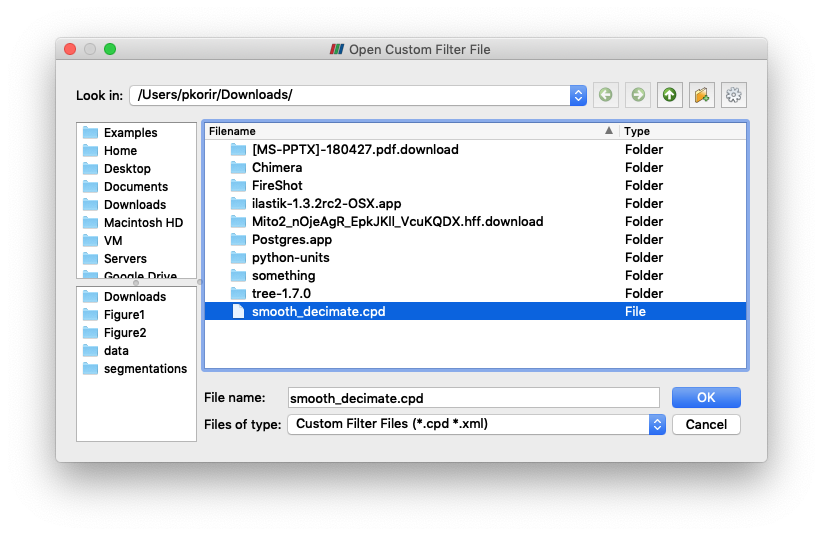
Navigate to the location where you downloaded the custom filter the click OK.
It will now be listed in the Custom Filter Manager.
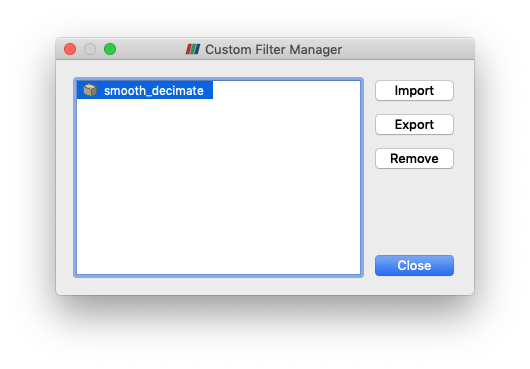
Click Close to dismiss this dialogue box.
5. Right-click the STL file in the Pipeline Browser then select Add Filter > Alphabetical > smooth_decimate. You might need to hit the Apply button to run this filter.
You should now see a change in the statistics for this surface.

Your surface now has fewer polygons with little volume distortion.
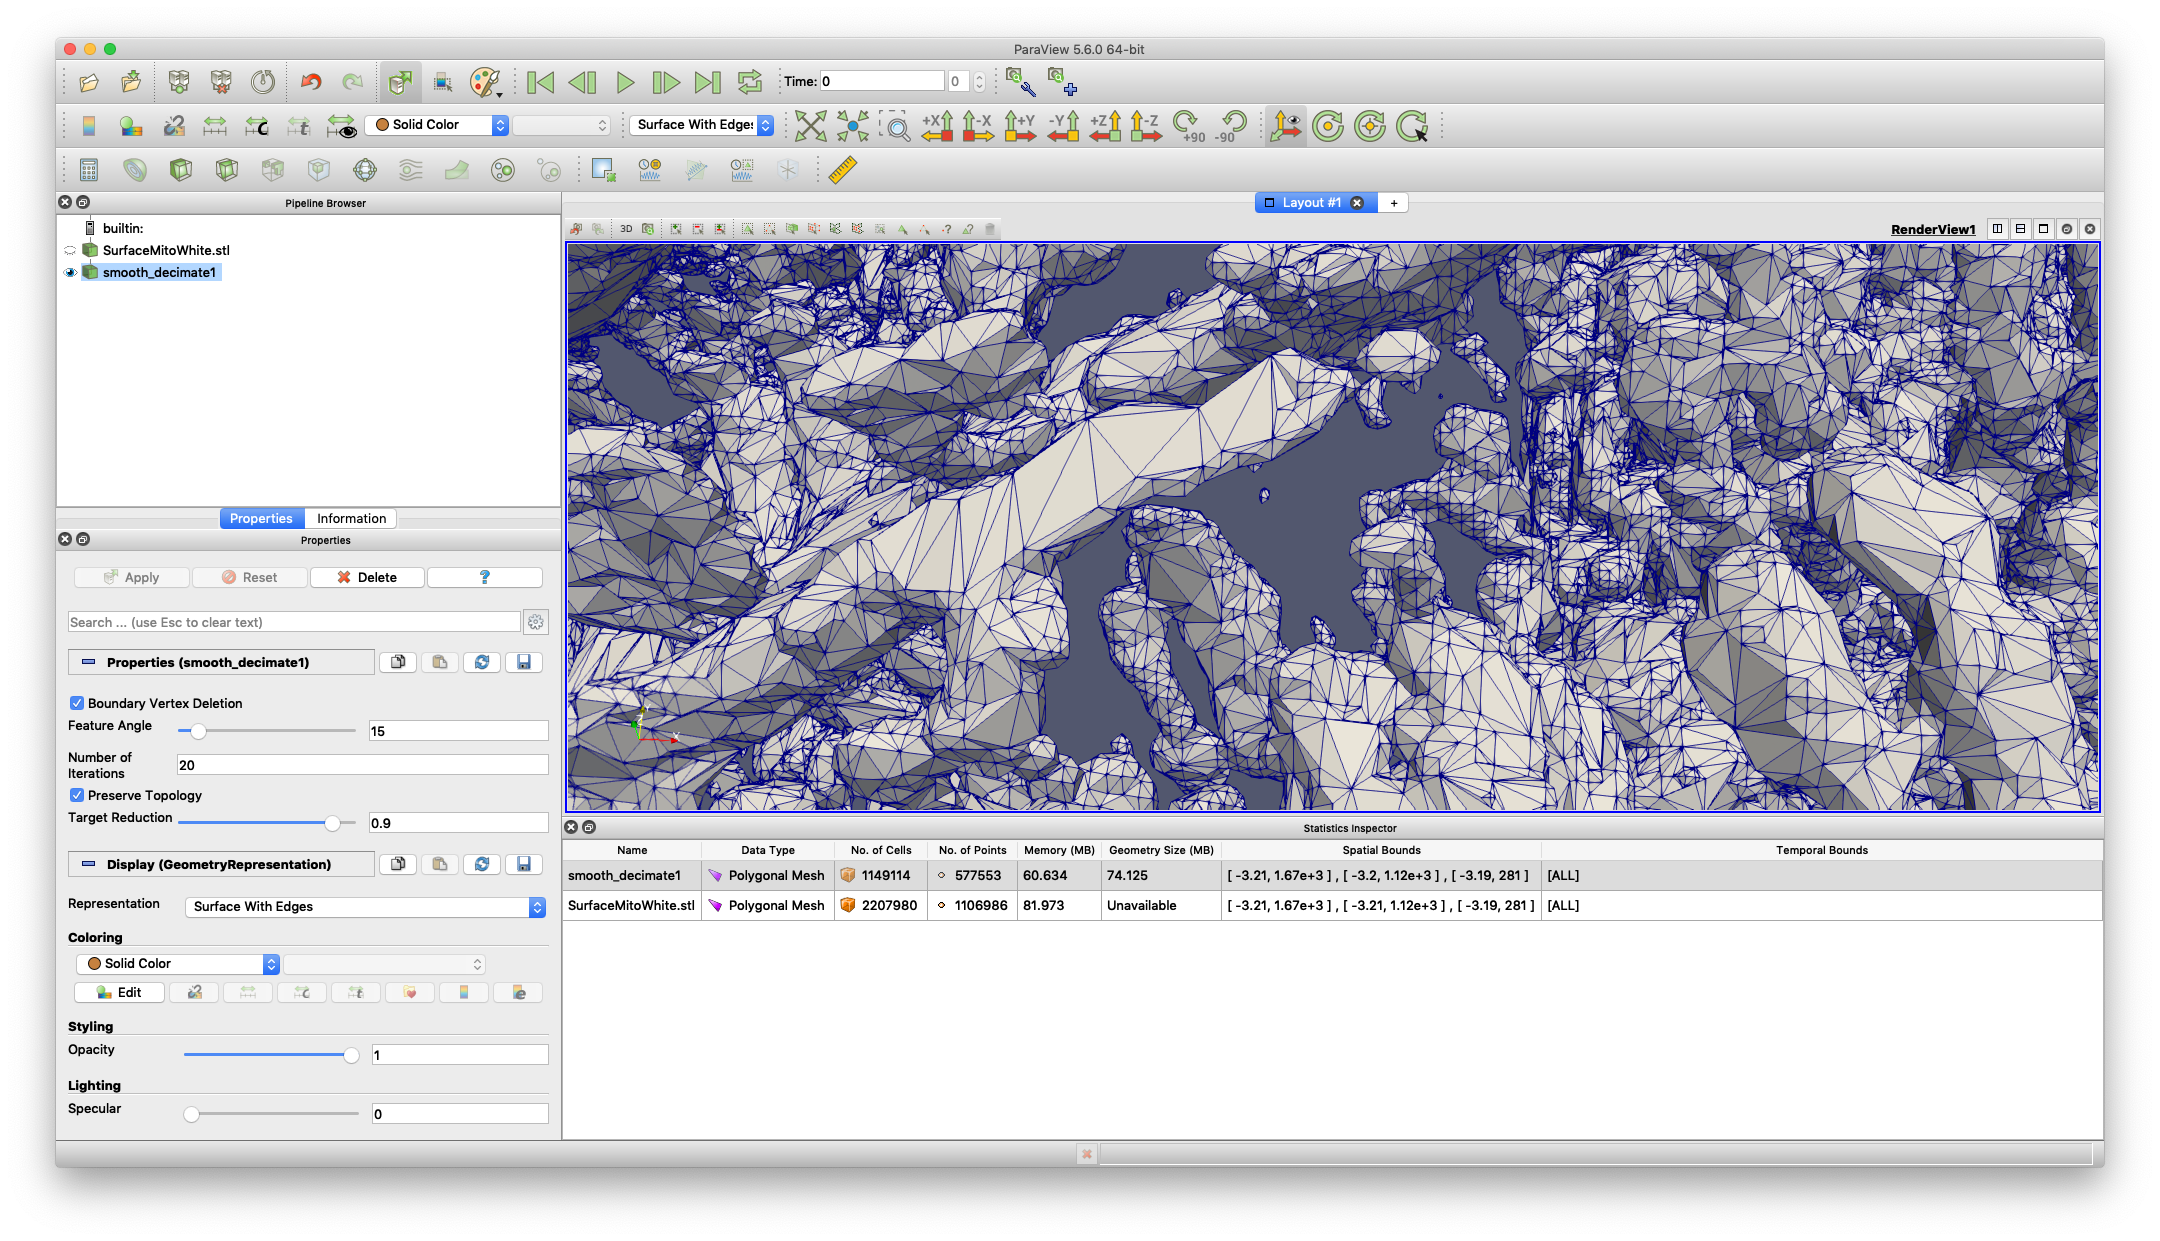
You can play with the parameters in the Properties dialogue to modify how the filters work.
Cropping STAR Files
In certain situations, it may be necessary to crop a STAR file to a smaller subset of particles.
This is particularly useful when
running tests on a large dataset and only a small subset is required. The sff prep starcrop utility is used to
achieve this.
sff prep starcrop
usage: sff prep starcrop [-h] [-p CONFIG_PATH] [-b] [-v] [-o OUTPUT]
                                                 [--infix INFIX] [--rows ROWS]
                                                 [--image-name-field IMAGE_NAME_FIELD]
                                                 star_file

Truncate a composite star file to the specified number of rows (default: 100)

positional arguments:
  star_file             the composite star file

optional arguments:
  -h, --help            show this help message and exit
  -p CONFIG_PATH, --config-path CONFIG_PATH
                                                path to configs file
  -b, --shipped-configs
                                                use shipped configs only if config path and user
                                                configs fail [default: False]
  -v, --verbose         verbose output
  -o OUTPUT, --output OUTPUT
                                                output file name [default: <infile>_cropped.star]
  --infix INFIX         infix to be added to filenames e.g. file.star ->
                                                file_<infix>.star [default: 'cropped']
  --rows ROWS           the number of rows to keep [default: 100]
  --image-name-field IMAGE_NAME_FIELD
                                                the field in the star file that contains the image
                                                name [default: '_rlnImageName']
Splitting STAR Files
Typically, STAR files may be combined from multiple sources and it may be necessary to split them into their constituent parts.
This occurs when multiple tomograms are referenced to create a high resolution subtomogram average. The sff prep starsplit utility is used to achieve this.
usage: sff prep starsplit [-h] [-p CONFIG_PATH] [-b] [-v]
                                                  [--output-prefix OUTPUT_PREFIX]
                                                  [--image-path IMAGE_PATH]
                                                  [--image-extension IMAGE_EXTENSION]
                                                  [--image-name-prefix IMAGE_NAME_PREFIX]
                                                  [--image-name-field IMAGE_NAME_FIELD]
                                                  star_file

Split a composite star file into individual star files distinguished by the
<rlnImageName> key

positional arguments:
  star_file             the composite star file

optional arguments:
  -h, --help            show this help message and exit
  -p CONFIG_PATH, --config-path CONFIG_PATH
                                                path to configs file
  -b, --shipped-configs
                                                use shipped configs only if config path and user
                                                configs fail [default: False]
  -v, --verbose         verbose output
  --output-prefix OUTPUT_PREFIX
                                                a prefix to use for the output files; the output files
                                                are named <prefix>_<rlnImageName>.star [default:
                                                '<composite-name>_']
  --image-path IMAGE_PATH
                                                the correct local path to the tomogram files [default:
                                                '']
  --image-extension IMAGE_EXTENSION
                                                the file extension to use for the tomogram files
                                                [default: 'mrc']
  --image-name-prefix IMAGE_NAME_PREFIX
                                                in many star files, the <rlnImageName> values will be
                                                a local path; the actual image name (a .mrc file) may
                                                contain additional characters that makes it difficult
                                                to categorise the tomograms e.g.
                                                'path/my_tomogram1_001.mrc',
                                                'path/my_tomogram1_002.mrc',
                                                'path/my_tomogram2_001.mrc'. In this example, we have
                                                two tomograms ('my_tomogram1' and 'my_tomogram2') but
                                                the additional characters ('_001', '_002') make it
                                                difficult to categorise the tomograms. This option
                                                allows you to specify a prefix to remove from the
                                                <rlnImageName> values. You can also use a REGEX in
                                                quotes e.g. 'my_tomogram\d'. [default: '']
  --image-name-field IMAGE_NAME_FIELD
                                                the field in the star file that contains the image
                                                name [default: '_rlnImageName']
Setting Configurations
Some of the functionality provided by sfftk relies on persistent configurations.
In the section we outline all you need to know to work with sfftk configurations.
Configurations are handled using the config utility with several subcommands.
sff config [subcommand]
For example:
sff config get --all
Fri Jan 19 14:03:34 2018        Reading configs from /Users/pkorir/.sfftk/sff.conf
Fri Jan 19 14:03:34 2018        Listing all 3 configs...
__TEMP_FILE          = ./temp-annotated.json
__TEMP_FILE_REF      = @
NAME                 = VALUE
Configuration Commands
Getting a single configuration value
sff config get CONFIG_NAME
Listing available configurations
sff config get --all
Setting a single configuration value
sff config set CONFIG_NAME CONFIG_VALUE
Deleting a single configuration
sff config del CONFIG_NAME
Clearing all configurations
sff config del --all
Where Configurations Are Stored
sfftk ships with a config file called sff.conf which is located in the root of the package.
In some cases this might be a read-only location e.g. if installed in an unmodified /usr/local/lib/python2.7/site-packages.
Therefore, default read-only configurations will be obtained from this file.
However, if the user would like to write new configs they will be written to ~/sfftk/sff.conf.
Additionally, a user may specify a third location using the -p/--config-path flag to either read or write a new config.
Correspondingly, custom configs will only be used if the -p/--config-path flag is used.
For example
sff config set NAME VAL
will add the line NAME=VAL to ~/.sfftk/sff.conf but
sff config set NAME VAL --config-path /path/to/sff.conf
will add it to /path/to/sff.conf (provided it is writable by the current user).
The order of precedence, therefore is:
custom configs specified with
-p/--config-path;user configs in
~/.sfftk/sff.conf; thenshipped configs (fallback if none of the above are present) which are prioritised using the
-b/--shipped-configsoption;
Running Unit Tests
sff tests [tool]
where tool is one of all, core, main, formats, readers, notes or schema.